SAMD11C14 UPDI Programmer
This page is a memo for how to make SAMD11C14 as an USB-Serial interface and program target board (ATtiny1614 board) over UPDI.
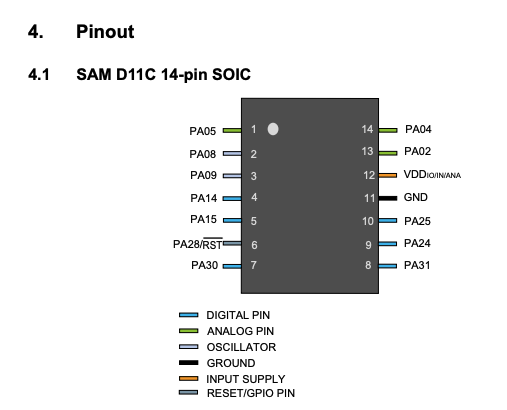
SAMD11C14
Specification
- 16KB of flash and 4KB of SRAM
- Up to 48MHz operating frequency
- Three serial communication modules (SERCOM) configurable as UART/USART, SPI or I2C, two 16-bit timer/counters, 32-bit Real-Time Clock and calendar, 12 PWM channels, one 8- or 10-channel 12-bit ADC, one 10-bit DAC
- Full Speed USB device
- Supports 7/12 self-capacitance touch channels in low/high pincount devices
- Supports 72 mutual-capacitance touch channels
- 1.62V to 3.63V power supply
- Easy pin migration to SAMD11C devices
- Supported by Atmel Studio, ASF and the SAM D11 Xplained Pro kit
Comparing to ATTiny1614, 14-pins micro controller family in AVR-1 series with 16 KB Flash / 2 KB SRAM / running at up to 20 MHz, SAMD11C14 has higher specification.
Pinout
Refs.
Environment
I firstly tried Mac OS 12.0.1 (Monterey). However, the JTAG programmer needs to be setup to Rpi zero in my case. The reason will be followed.
Host computer for burn bootloader
I used Raspberry Pi Zero W for burning bootloader over openocd.
| $ lsb_release -a
No LSB modules are available.
Distributor ID: Raspbian
Description: Raspbian GNU/Linux 10 (buster)
Release: 10
Codename: buster
|
Host computer for program applicattion
My machine is Macbook pro and make program on Arduino
IDE
- Macbook Pro: Mac OS 12.0.1 Monterey
- Arduino IDE 1.8.16
Board
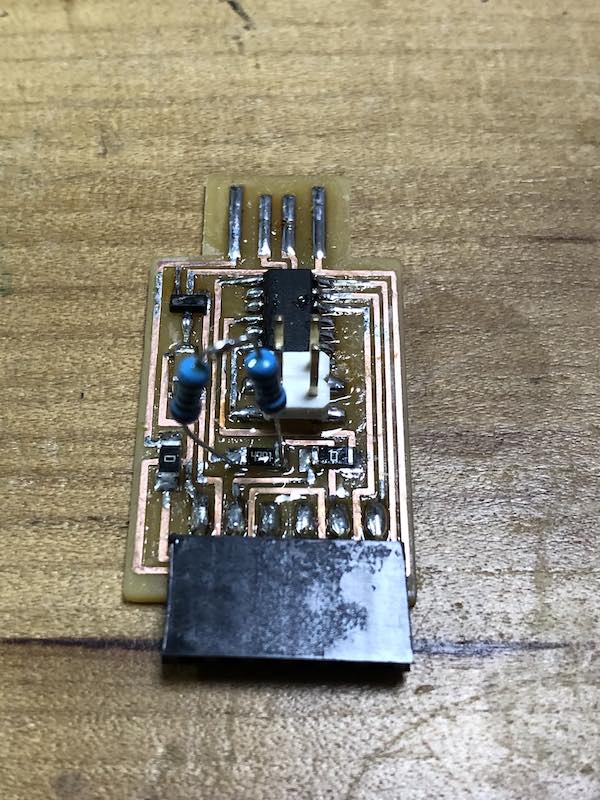
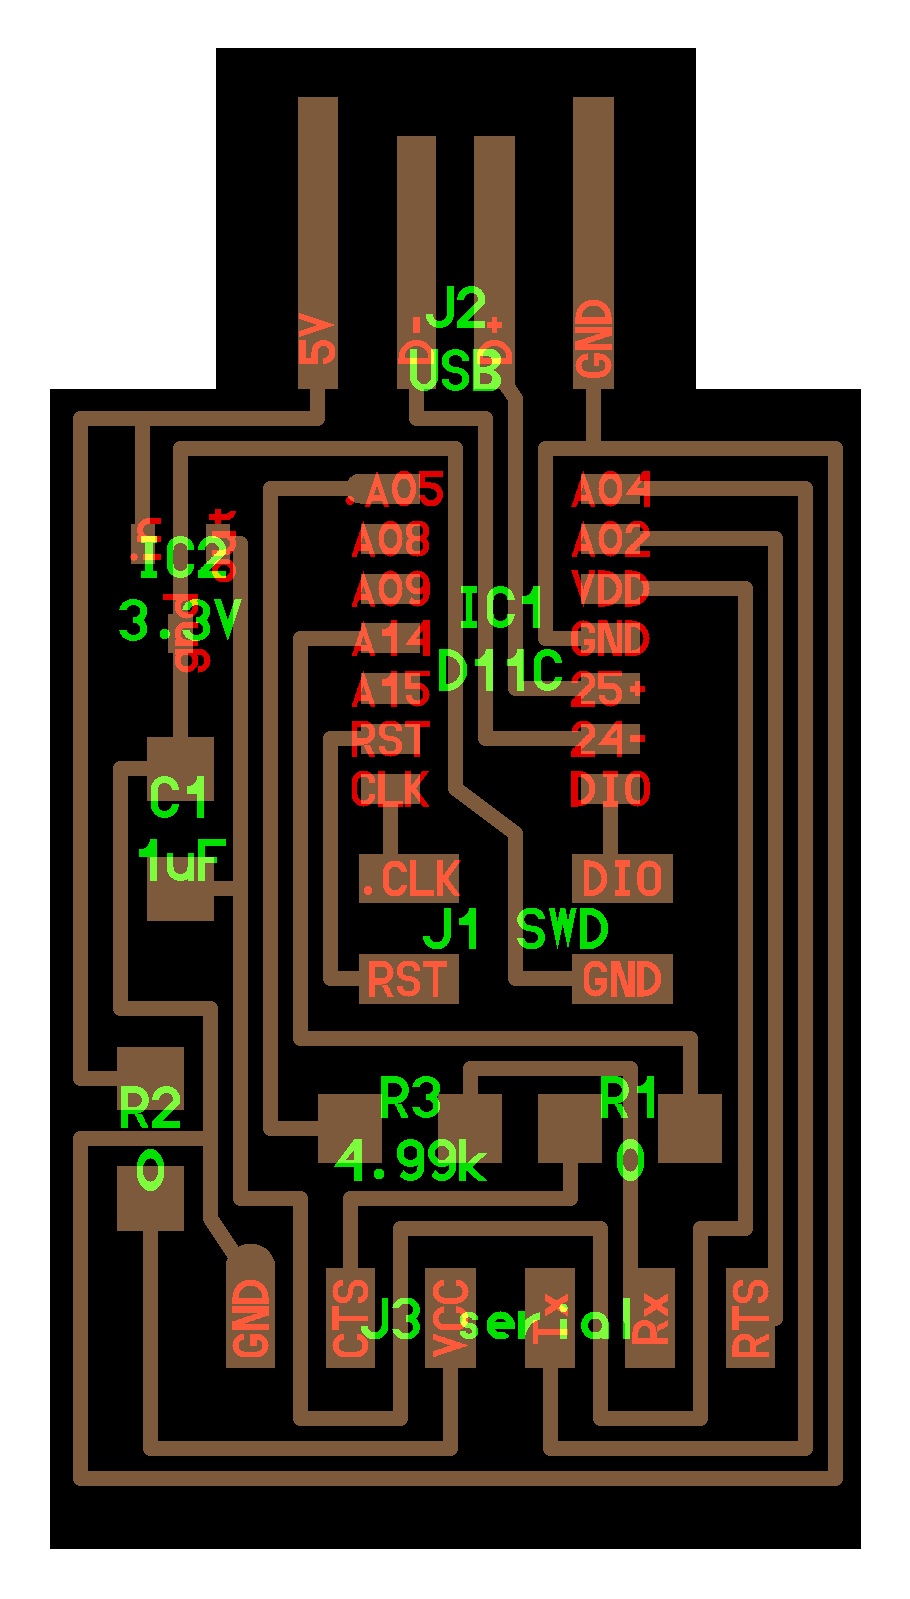
USB-D11C-serial board at Fab Academy embedded programming page.
Yuichi@kannai thankfully sent the components and milled circuit board to my home.
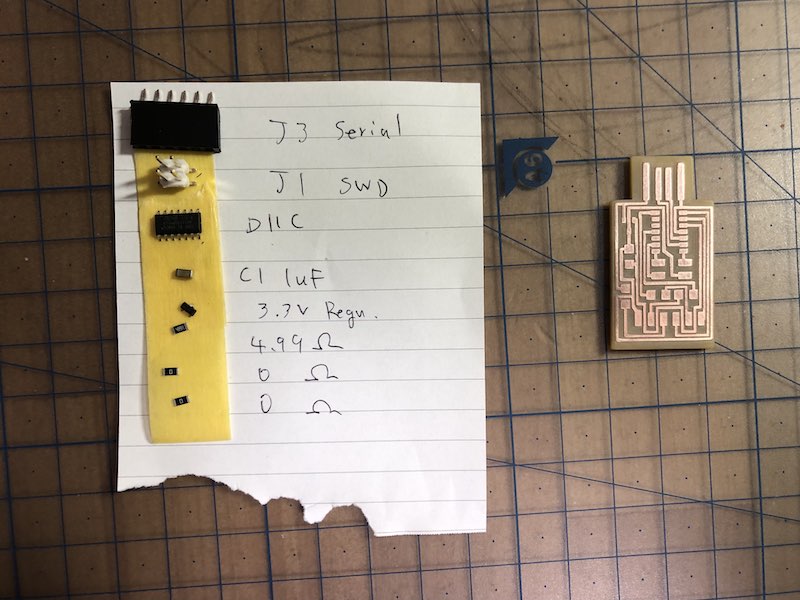
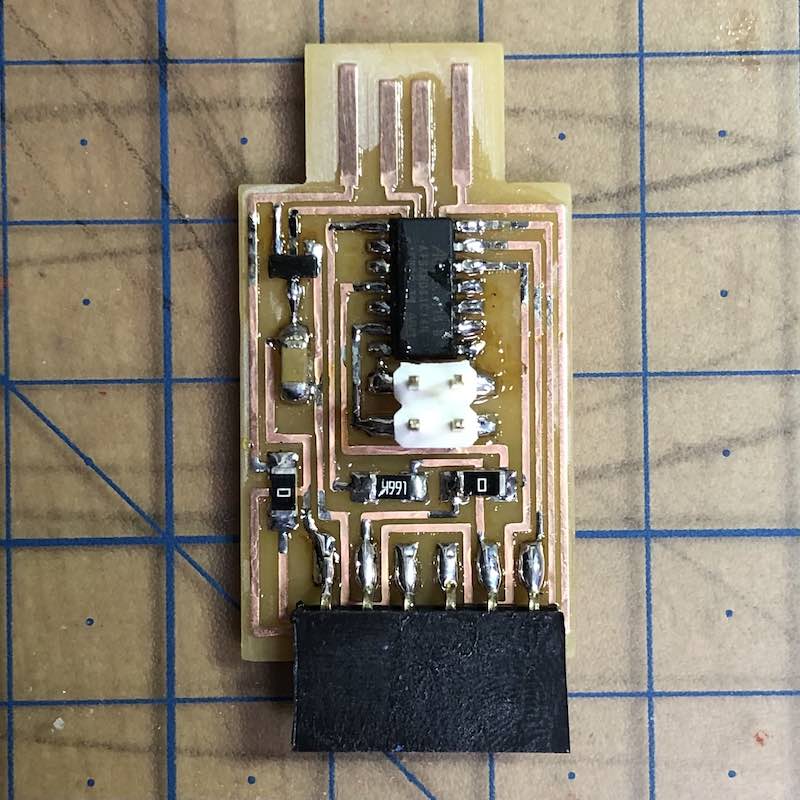
Assembled.
Burn bootloader
Without burning bootloader, the board is not recognized as a USB device from host computer.
Following past documentation Quentin, I update bootloader to the board overedbg.
edbg is a command line utility for programming ARM-based MCUs through CMSIS-DAP SWD interface. It works on Linux, Mac OS X and Windows.
Setup edbg (DID NOT work for my Pi Zero)
-
Install dependency
below is for mac.
| brew update
brew install libhid hidapi
|
-
Clone source code and make
| git clone git@github.com:ataradov/edbg.git
cd edbg
make all
# Run the command
./edbg -help
CMSIS-DAP SWD programmer. Built Nov 26 2021 18:41:09.
|
Raspberry Pi Zero as a JTAG programmer
As of 26 Nov 2021: Now that I found I do not have JTAG programmer device. I need something like this?, or make substitute programmer by Raspberry Pi like this example. I decided to try raspberry Pi Zero as a JTAG programmer as I have Pi zero.
Install and compile Open OCD
After connecting Raspberry Pi over SSH, install dependent libraries.
| $sudo apt-get update
$ sudo apt-get install git autoconf libtool make pkg-config libusb-1.0-0 libusb-1.0-0-dev
|
Download the latest source code for OpenOCD with
| $ git clone http://openocd.zylin.com/openocd
|
Run boot strapper by:
| $ cd openocd
$ ./bootstratp
|
Enable bcm2835gpio
1
2
3
4
5
6
7
8
9
10
11
12
13
14
15
16
17
18
19
20
21
22
23
24
25
26
27
28
29
30
31 | $ ./configure --enable-sysfsgpio --enable-bcm2835gpio
# Then I had
...
OpenOCD configuration summary
--------------------------------------------------
MPSSE mode of FTDI based devices yes (auto)
ST-Link Programmer yes (auto)
TI ICDI JTAG Programmer yes (auto)
Keil ULINK JTAG Programmer yes (auto)
Altera USB-Blaster II Compatible yes (auto)
Bitbang mode of FT232R based devices yes (auto)
Versaloon-Link JTAG Programmer yes (auto)
TI XDS110 Debug Probe yes (auto)
CMSIS-DAP v2 Compliant Debugger yes (auto)
OSBDM (JTAG only) Programmer yes (auto)
eStick/opendous JTAG Programmer yes (auto)
Olimex ARM-JTAG-EW Programmer yes (auto)
Raisonance RLink JTAG Programmer yes (auto)
USBProg JTAG Programmer yes (auto)
Andes JTAG Programmer yes (auto)
CMSIS-DAP Compliant Debugger no
Nu-Link Programmer no
Cypress KitProg Programmer no
Altera USB-Blaster Compatible no
ASIX Presto Adapter no
OpenJTAG Adapter no
Linux GPIO bitbang through libgpiod no
SEGGER J-Link Programmer yes (auto)
Bus Pirate yes (auto)
Use Capstone disassembly framework no
|
Check Pinout
1
2
3
4
5
6
7
8
9
10
11
12
13
14
15
16
17
18
19
20
21
22
23
24
25
26
27
28
29
30
31
32
33
34
35
36
37
38
39
40
41
42
43
44 | $ sudo apt install python3-gpiozero
$ pinout
.-------------------------.
| oooooooooooooooooooo J8 |
| 1ooooooooooooooooooo |c
---+ +---+ PiZero W|s
sd| |SoC| V1.1 |i
---+|hdmi| +---+ usb pwr |
`---| |--------| |-| |-'
Revision : 9000c1
SoC : BCM2835
RAM : 512Mb
Storage : MicroSD
USB ports : 1 (excluding power)
Ethernet ports : 0
Wi-fi : True
Bluetooth : True
Camera ports (CSI) : 1
Display ports (DSI): 0
J8:
3V3 (1) (2) 5V
GPIO2 (3) (4) 5V
GPIO3 (5) (6) GND
GPIO4 (7) (8) GPIO14
GND (9) (10) GPIO15
GPIO17 (11) (12) GPIO18
GPIO27 (13) (14) GND
GPIO22 (15) (16) GPIO23
3V3 (17) (18) GPIO24
GPIO10 (19) (20) GND
GPIO9 (21) (22) GPIO25
GPIO11 (23) (24) GPIO8
GND (25) (26) GPIO7
GPIO0 (27) (28) GPIO1
GPIO5 (29) (30) GND
GPIO6 (31) (32) GPIO12
GPIO13 (33) (34) GND
GPIO19 (35) (36) GPIO16
GPIO26 (37) (38) GPIO20
GND (39) (40) GPIO21
For further information, please refer to https://pinout.xyz/
|
Compile OpenOCD
This took around 30 minutes for my Pi zero.
Install OpenOCD
After installation, you can see all available interface in:
1
2
3
4
5
6
7
8
9
10
11
12
13
14
15
16
17
18
19
20
21
22
23 | $ ls /usr/local/share/openocd/scripts/interface
altera-usb-blaster2.cfg nulink.cfg
altera-usb-blaster.cfg opendous.cfg
arm-jtag-ew.cfg openjtag.cfg
at91rm9200.cfg osbdm.cfg
buspirate.cfg parport.cfg
calao-usb-a9260.cfg parport_dlc5.cfg
chameleon.cfg raspberrypi2-native.cfg
cmsis-dap.cfg raspberrypi-native.cfg
dln-2-gpiod.cfg rlink.cfg
dummy.cfg rshim.cfg
estick.cfg stlink.cfg
flashlink.cfg stlink-dap.cfg
ft232r stlink-v1.cfg
ft232r.cfg stlink-v2-1.cfg
ftdi stlink-v2.cfg
imx-native.cfg sysfsgpio-raspberrypi.cfg
jlink.cfg ti-icdi.cfg
jtag_dpi.cfg ulink.cfg
jtag_hat_rpi2.cfg usb-jtag.cfg
jtag_vpi.cfg usbprog.cfg
kitprog.cfg vsllink.cfg
nds32-aice.cfg xds110.cfg
|
Wiring
Pi Zero pin numbering is for BCM2835 GPIOs
| Pi Zero |
Target(USB-SAMD11C14-Serial board) |
| #18 |
Reset |
| GND |
GND |
| #24 |
SWDIO |
| #25 |
SWCLK |
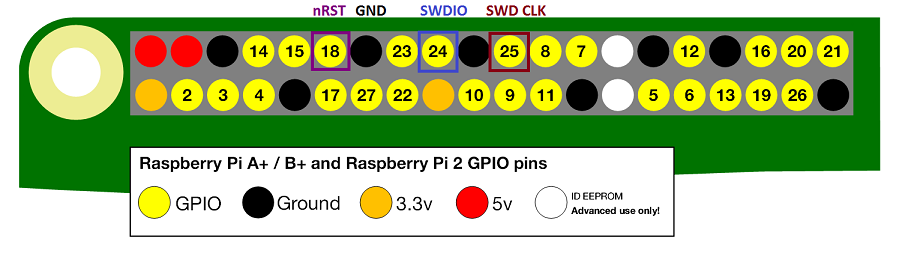
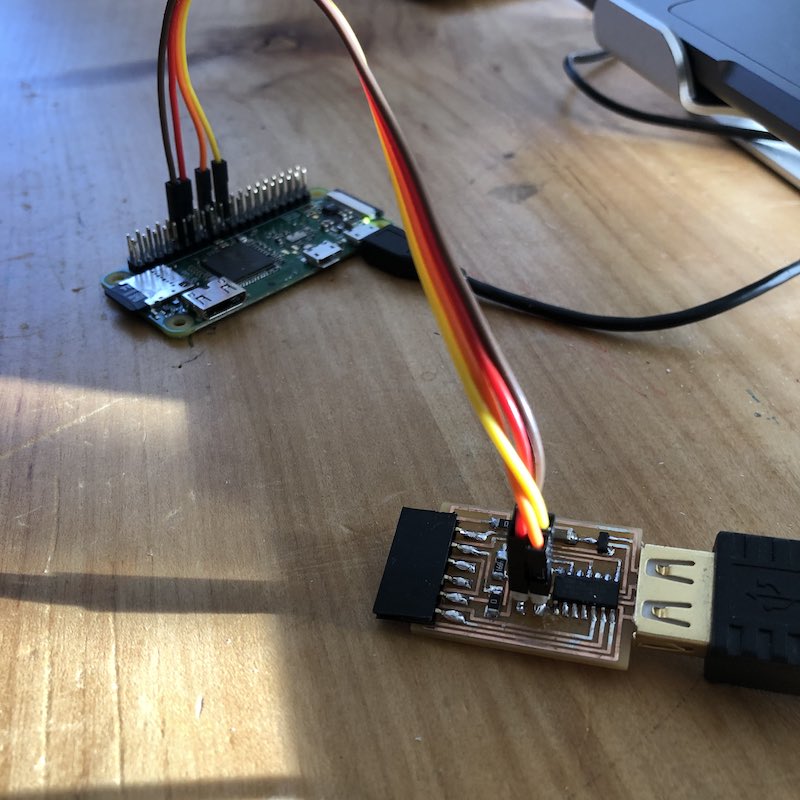
Ref. adafruit.com | Programming Microcontrollers using OpenOCD on a Raspberry Pi
Create OpenOCD config
On Rpi Zero, make bootloader directory and download bootloader binary file.
| $ cd ~
$ mkdir bootloader
$ cd bootloader
|
Then download sam_ba_Generic_D11C14A_SAMD11C14A.bin bootloader to bootloader directory.
Create config at bootloader directory:
openocd.cfg
1
2
3
4
5
6
7
8
9
10
11
12
13
14
15
16
17
18
19
20 | source [find interface/raspberrypi2-native.cfg]
transport select swd
set CHIPNAME at91samd11d14a
source [find target/at91samdXX.cfg]
# did not yet manage to make a working setup using srst
#reset_config srst_only
reset_config srst_nogate
adapter_nsrst_delay 100
adapter_nsrst_assert_width 100
bcm2835gpio_swd_nums 25 24
bcm2835gpio_trst_num 7
bcm2835gpio_srst_num 18
init
targets
reset halt
|
1
2
3
4
5
6
7
8
9
10
11
12
13
14
15
16
17
18
19
20
21
22 | $ sudo openocd
Open On-Chip Debugger 0.11.0+dev-00502-gf66a16c4a (2021-11-27-00:00)
Licensed under GNU GPL v2
For bug reports, read
http://openocd.org/doc/doxygen/bugs.html
DEPRECATED! use 'adapter srst delay' not 'adapter_nsrst_delay'
DEPRECATED! use 'adapter srst pulse_width' not 'adapter_nsrst_assert_width'
DEPRECATED! use 'bcm2835gpio swd_nums' not 'bcm2835gpio_swd_nums'
DEPRECATED! use 'bcm2835gpio trst_num' not 'bcm2835gpio_trst_num'
DEPRECATED! use 'bcm2835gpio srst_num' not 'bcm2835gpio_srst_num'
Info : BCM2835 GPIO JTAG/SWD bitbang driver
Info : clock speed 400 kHz
Info : SWD DPIDR 0x0bc11477
Info : at91samd21g18.cpu: Cortex-M0+ r0p1 processor detected
Info : at91samd21g18.cpu: target has 4 breakpoints, 2 watchpoints
Info : at91samd21g18.cpu: external reset detected
Info : starting gdb server for at91samd21g18.cpu on 3333
Info : Listening on port 3333 for gdb connections
target halted due to debug-request, current mode: Thread
xPSR: 0xf1000000 pc: 0xfffffffe msp: 0xfffffffc
Info : Listening on port 6666 for tcl connections
Info : Listening on port 4444 for telnet connections
|
If this works, shutdown the process by Ctrl+C. Then append below to openocd.cfg
1
2
3
4
5
6
7
8
9
10
11
12
13
14
15
16
17
18
19
20
21
22
23
24
25
26 | source [find interface/raspberrypi2-native.cfg]
transport select swd
set CHIPNAME at91samd11d14a
source [find target/at91samdXX.cfg]
# did not yet manage to make a working setup using srst
# reset_config srst_only
reset_config srst_nogate
adapter srst delay 100
adapter srst pulse_width 100
bcm2835gpio_swd_nums 25 24
bcm2835gpio_trst_num 7
bcm2835gpio_srst_num 18
init
targets
reset halt
at91samd bootloader 0
program sam_ba_Generic_D11C14A_SAMD11C14A.bin verify
at91samd bootloader 4096
reset
shutdown
|
This will init, look for targets, reset and halt the chip, turn off bootloader protection, burn in the bootloader file and verify it, re-turn-on bootloader protection, reset and shutdown openocd
Then save the file and run openocd
 1
 2
 3
 4
 5
 6
 7
 8
 9
10
11
12
13
14
15
16
17
18
19
20
21
22
23
24
25
26
27
28
29
30
31
32
33
34
35
36 | $ sudo openocd
Open On-Chip Debugger 0.11.0+dev-00502-gf66a16c4a (2021-11-27-00:00)
Licensed under GNU GPL v2
For bug reports, read
http://openocd.org/doc/doxygen/bugs.html
DEPRECATED! use 'adapter srst delay' not 'adapter_nsrst_delay'
DEPRECATED! use 'adapter srst pulse_width' not 'adapter_nsrst_assert_width'
DEPRECATED! use 'bcm2835gpio swd_nums' not 'bcm2835gpio_swd_nums'
DEPRECATED! use 'bcm2835gpio trst_num' not 'bcm2835gpio_trst_num'
DEPRECATED! use 'bcm2835gpio srst_num' not 'bcm2835gpio_srst_num'
Info : BCM2835 GPIO JTAG/SWD bitbang driver
Info : clock speed 400 kHz
Info : SWD DPIDR 0x0bc11477
Info : at91samd11d14a.cpu: Cortex-M0+ r0p1 processor detected
Info : at91samd11d14a.cpu: target has 4 breakpoints, 2 watchpoints
Info : at91samd11d14a.cpu: external reset detected
Info : starting gdb server for at91samd11d14a.cpu on 3333
Info : Listening on port 3333 for gdb connections
target halted due to debug-request, current mode: Thread
xPSR: 0xf1000000 pc: 0xfffffffe msp: 0xfffffffc
target halted due to debug-request, current mode: Thread
xPSR: 0xf1000000 pc: 0xfffffffe msp: 0xfffffffc
** Programming Started **
Info : SAMD MCU: SAMD11C14A (16KB Flash, 4KB RAM)
Error: SAMD: NVM programming error
Error: Failed to erase row containing 00000100
Error: SAMD: failed to erase sector 1 at 0x00000100
Error: failed erasing sectors 0 to 15
embedded:startup.tcl:1070: Error: ** Programming Failed **
in procedure 'script'
at file "embedded:startup.tcl", line 26
in procedure 'program' called at file "openocd.cfg", line 23
in procedure 'program_error' called at file "embedded:startup.tcl", line 1135
at file "embedded:startup.tcl", line 1070
Info : Listening on port 6666 for tcl connections
Info : Listening on port 4444 for telnet connections
|
It failed by Error: SAMD: NVM programming error.
Tweaking openocd.cfg as bellow, it seems to work.
openocd.cfg
 1
 2
 3
 4
 5
 6
 7
 8
 9
10
11
12
13
14
15
16
17
18
19
20
21
22
23
24
25
26 | source [find interface/raspberrypi2-native.cfg]
transport select swd
set CHIPNAME at91samd11d14a
source [find target/at91samdXX.cfg]
# did not yet manage to make a working setup using srst
reset_config srst_only
# reset_config srst_nogate
adapter srst delay 200
adapter srst pulse_width 100
bcm2835gpio swd_nums 25 24
bcm2835gpio trst_num 7
bcm2835gpio srst_num 18
init
targets
reset halt
at91samd bootloader 0
program sam_ba_Generic_D11C14A_SAMD11C14A.bin verify
at91samd bootloader 4096
reset
shutdown
|
1
2
3
4
5
6
7
8
9
10
11
12
13
14
15
16
17
18
19
20
21
22
23
24
25
26
27
28 | $ sudo openocd
Open On-Chip Debugger 0.11.0+dev-00502-gf66a16c4a (2021-11-27-00:00)
Licensed under GNU GPL v2
For bug reports, read
http://openocd.org/doc/doxygen/bugs.html
Info : BCM2835 GPIO JTAG/SWD bitbang driver
Info : clock speed 400 kHz
Info : SWD DPIDR 0x0bc11477
Info : at91samd11d14a.cpu: Cortex-M0+ r0p1 processor detected
Info : at91samd11d14a.cpu: target has 4 breakpoints, 2 watchpoints
Info : at91samd11d14a.cpu: external reset detected
Info : starting gdb server for at91samd11d14a.cpu on 3333
Info : Listening on port 3333 for gdb connections
Info : SWD DPIDR 0x0bc11477
target halted due to debug-request, current mode: Thread
xPSR: 0x01000000 pc: 0x0000059c msp: 0x20000fd4
Info : SWD DPIDR 0x0bc11477
target halted due to debug-request, current mode: Thread
xPSR: 0x61000000 pc: 0x00000642 msp: 0x20000fd4
** Programming Started **
Info : SAMD MCU: SAMD11C14A (16KB Flash, 4KB RAM)
** Programming Finished **
** Verify Started **
** Verified OK **
Info : SWD DPIDR 0x0bc11477
shutdown command invoked
Info : Listening on port 6666 for tcl connections
Info : Listening on port 4444 for telnet connections
|
After plugging off SWD pins in target board of SAMD11C14 disconnecting from raspberry pi, the board is recognized as USB device from host computer (Mac)
| $ ls /dev | grep usb
cu.usbmodem2101
tty.usbmodem2101
|
Following Queintin’s document
Setup ArduinoSMD Core to Arduino IDE
See arduinocore_samd
Upload program to SAMD11C14A for bridging serial communication
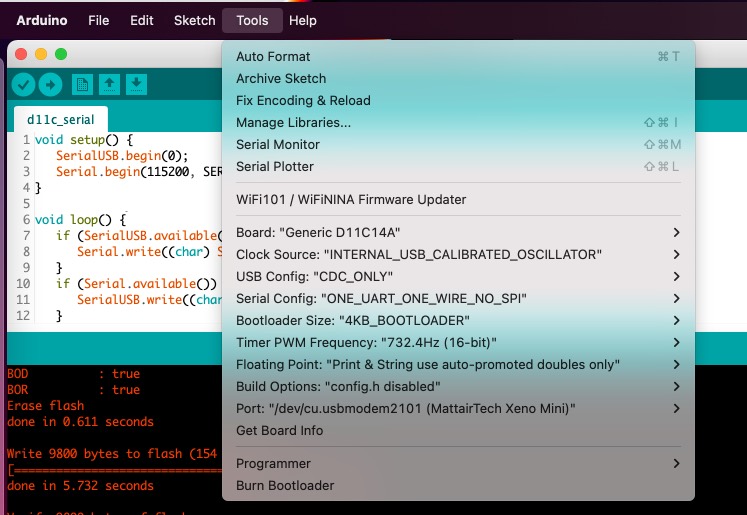
Make sure:
- Board: Generic D11C14A
- Serial Config: ONE_UART_ONE_WIRE_NO_SPI
- Bootloader Size: 4KB_BOOTLOAARDER
- Port: Your port number (with “MattairTech Xeno Mini”)
I tweaked source code in class page as my board has only one UART/UPDI serial config.
d11c_serial.ino
1
2
3
4
5
6
7
8
9
10
11
12
13 | void setup() {
SerialUSB.begin(0);
Serial.begin(115200, SERIAL_8E2);
}
void loop() {
if (SerialUSB.available()) {
Serial.write((char) SerialUSB.read());
}
if (Serial.available()) {
SerialUSB.write((char) Serial.read());
}
}
|
Then “upload” the sketch from Arduino IDE
 1
 2
 3
 4
 5
 6
 7
 8
 9
10
11
12
13
14
15
16
17
18
19
20
21
22
23
24
25
26
27
28
29
30
31
32 | /Users/tato/Documents/Arduino/d11c_serial/d11c_serial.ino: In function 'void setup()':
/Users/tato/Documents/Arduino/d11c_serial/d11c_serial.ino:3:35: warning: large integer implicitly truncated to unsigned type [-Woverflow]
Serial.begin(115200, SERIAL_8E2);
^
Sketch uses 9448 bytes (76%) of program storage space. Maximum is 12288 bytes.
Atmel SMART device 0x10030006 found
Device : ATSAMD11C14A
Chip ID : 10030006
Version : v2.0 Nov 22 2017 12:56:25
Address : 4096
Pages : 192
Page Size : 64 bytes
Total Size : 12KB
Planes : 1
Lock Regions : 16
Locked : none
Security : false
Boot Flash : true
BOD : true
BOR : true
Erase flash
done in 0.611 seconds
Write 9800 bytes to flash (154 pages)
[==============================] 100% (154/154 pages)
done in 5.732 seconds
Verify 9800 bytes of flash
[==============================] 100% (154/154 pages)
Verify successful
done in 0.392 seconds
CPU reset.
|

This looks work(?)
NO. It looks SerialUSB and Serial has the same channel, so this program works as echo program :sweat_smile: (that is not intended)
I roll backed the source code to the one in class page using Serial2 and changed the board settings.
d11c_serial2.ino
1
2
3
4
5
6
7
8
9
10
11
12
13 | void setup() {
SerialUSB.begin(0);
Serial2.begin(115200, SERIAL_8E2);
}
void loop() {
if (SerialUSB.available()) {
Serial2.write((char) SerialUSB.read());
}
if (Serial2.available()) {
SerialUSB.write((char) Serial2.read());
}
}
|
Changed:
- Serial Config: TWO_UART_ONE_WIRE_NO_SPI
This soruce code and board settings worked for compiling and uploading. However, the serial bridging application seems not work - I could not confirm message received by serial connector from the target board (Attiny3216) on Serial monitor in Arduino IDE.

Though I tried to bridge resisters of 1.6KΩ to R3: 4.9KΩ in parallel for lowering the resister to 1.2KΩ based on mattermost instructors’ discussion, it did not work for my case.
i.e. Calculation for parallel ciurcuit with resisters
Total resister (1.2kΩ) = 1/((1/4.9kΩ)+1/ x Ω)
x = 1.589Ω ≒ 1.6Ω
I have 1.5KΩ and 120Ω resisters, so, I amended the circuit like this.
How ever, the outcome was the same and I could not confirm Serial communication with this as an USB-Serial bridging device.
TO BE CONTINUED (as of 27 Nov. 2021)
Write program using D11C14 as a UPDI programmer
As the serial communication does not work as above, programming over serial port and 4.7k (pyupdi style) did not work (any cases in pyupdi, pymcuprog or uploading by Ardino megaTinyCore board manager)
In any tools, the error message says like:
| pymcuprog.pymcuprog_errors.PymcuprogError: UPDI initialisation failed
pymcuprog.pymcuprog_errors.PymcuprogError: UPDI initialisation failed
|
Try to vevert openocd version v0.11.0 to v0.10.0
For recovering above error, try to revert openocd.
| $ cd ~/openocd
$ git checkout -b tag_v0.10.0 refs/tags/v0.10.0
$ git branch -a
master
* tag_v0.10.0
remotes/origin/HEAD -> origin/master
remotes/origin/master
remotes/origin/v0.6.1
|
Then rebuild openocd again
| $ ./bootstrap
$ ./configure --enable-sysfsgpio --enable-bcm2835gpio
$ make
|
However, make failed by following error.
 1
 2
 3
 4
 5
 6
 7
 8
 9
10
11
12
13
14
15
16
17
18
19
20
21 | ...
libtool: compile: gcc -DHAVE_CONFIG_H -I. -I./src -I./src -I./src/helper -DPKGDATADIR=\"/usr/local/share/openocd\" -DBINDIR=\"/usr/local/bin\" -I./jimtcl -I./jimtcl -Wall -Wstrict-prototypes -Wformat-security -Wshadow -Wextra -Wno-unused-parameter -Wbad-function-cast -Wcast-align -Wredundant-decls -Werror -g -O2 -MT src/svf/svf.lo -MD -MP -MF src/svf/.deps/svf.Tpo -c src/svf/svf.c -o src/svf/svf.o
src/svf/svf.c: In function ‘svf_read_command_from_file’:
src/svf/svf.c:663:7: error: this statement may fall through [-Werror=implicit-fallthrough=]
i = -1;
~~^~~~
src/svf/svf.c:664:4: note: here
case '\r':
^~~~
src/svf/svf.c:667:8: error: this statement may fall through [-Werror=implicit-fallthrough=]
if (!cmd_pos)
^
src/svf/svf.c:669:4: note: here
default:
^~~~~~~
cc1: all warnings being treated as errors
make[2]: *** [Makefile:3022: src/svf/svf.lo] Error 1
make[2]: Leaving directory '/home/pi/openocd'
make[1]: *** [Makefile:3897: all-recursive] Error 1
make[1]: Leaving directory '/home/pi/openocd'
make: *** [Makefile:1821: all] Error 2
|
At openocd forum, above (svf related error) is reported as a bug for openocd v.0.10.0. openocd-devel@lists.sourceforge.net. It suggested "--disable-werror" when run configure.. By doing that, make completed without error.
| $ ./configure --enable-sysfsgpio --enable-bcm2835gpi --disable-werror
$ make
$ sudo make install
|
The command is completed. However, on running openocd it returns follows.
 1
 2
 3
 4
 5
 6
 7
 8
 9
10
11
12
13
14
15
16
17
18
19
20 | $ cd ../bootloader
$ sudo openocd
Open On-Chip Debugger 0.10.0-dirty (2021-11-30-00:10)
Licensed under GNU GPL v2
For bug reports, read
http://openocd.org/doc/doxygen/bugs.html
Error: The specified debug interface was not found (bcm2835gpio)
The following debug interfaces are available:
1: ftdi
2: usb_blaster
3: jlink
4: vsllink
5: ulink
6: hla
7: osbdm
8: opendous
9: sysfsgpio
10: aice
Error: Debug Adapter has to be specified, see "interface" command
|
To Be Contineud…
References
Last update: November 29, 2021