Skip to content

Read input value on switch from ATtiny1614

What’s this ?

Testing how I can “read” data from Serial communication on browser.

Materials

  • ATtiny1614 buzzer board (w/LED, tact switch and buzzer)
  • USB-FTDI Serial converter board
  • FTDI-SErial UPDI-3pin converter
  • USB Cable
  • Laptop PC (Macbook Pro)

Problem

Warning

I wanted to use analogRead() with pwm pin, but my 3216 breakout board was broken and my 1614 board does not have pwm input. Instead, I used digitalRead() by tactile switch and convert transmitting values by some logics.

How to read serial value?

  1. Serial monitor
  2. Serial Plotter
  3. Python (tkinter)
  4. Processing
  5. Browser (Web serial API + p5.js)

1. Serial monitor

Arduiono IDE > Tool > Serial monitor Set baud rate as you set on Arduino code (e.g.Serial.begin(9600))

2. Serial plotter

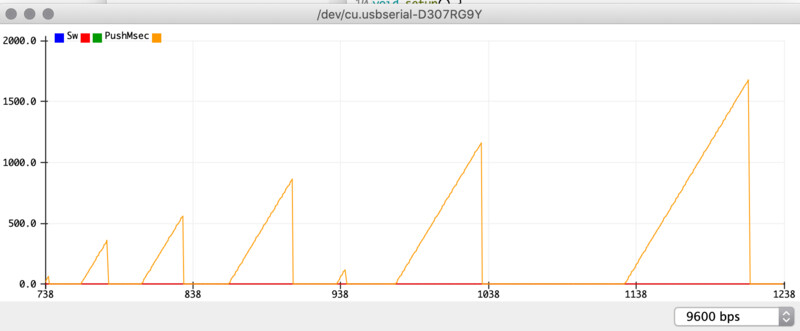
Arduiono IDE > Tool > Serial plotter Plotter visualize by time sequence.

t1614_fade_blink01.ino
LED blinks 3 times by interval time. Interval time is set by pushing tactile switch)
 1
 2
 3
 4
 5
 6
 7
 8
 9
10
11
12
13
14
15
16
17
18
19
20
21
22
23
24
25
26
27
28
29
30
31
32
33
34
35
36
37
38
39
40
41
42
43
44
45
46
47
48
49
50
const int switchPin = 0;
const int ledPin = 3;

int sw = 1;
boolean sw_pushed = false;

int pushMsec = 0;
int delayMsec = 1000;

void setup() {
  Serial.begin(9600);
  pinMode(switchPin, INPUT);
  pinMode(ledPin, OUTPUT);
}

void loop() {

  sw = digitalRead(switchPin);

  if (sw == 0) { 
    sw_pushed = true;
    pushMsec = pushMsec + delayMsec;

  } else {
    // Only one time after stop pushing
    if (sw_pushed) {

      // blink 3 time by <pushed milliseconds interval>
      int count = 1;
      while (count <= 3 ){
        digitalWrite(ledPin, HIGH);
        delay(pushMsec);
        digitalWrite(ledPin, LOW);
        delay(pushMsec);
        count += 1;       
      }
      // reset flag and pushed Msec time
      sw_pushed = false;
      pushMsec = 0;
    }
  }

  Serial.print("Sw: ");
  Serial.print(sw);
  Serial.print(" , PushMsec: ");
  Serial.println(pushMsec);

  delay(delayMsec);

}

Outcome (Serial plotter)

Serial plotter

3. Python (tkinter)

Tweaked python interface samples by Neil (Ref. FabAcademy - input devices)

 1
 2
 3
 4
 5
 6
 7
 8
 9
10
11
12
13
14
15
16
17
18
19
20
21
22
23
24
25
26
27
28
29
30
31
32
33
34
35
36
37
38
const int switchPin = 0;
const int ledPin = 3;

int sw = 1;
boolean sw_pushed = false;

int pushMsec = 0;
int delayMsec = 30;

void setup() {
  Serial.begin(9600);
  pinMode(switchPin, INPUT);
  pinMode(ledPin, OUTPUT);
}

void loop() {
  // Send framing
  Serial.write(1);
  Serial.write(2);
  Serial.write(3);
  Serial.write(4);

  sw = digitalRead(switchPin);

  if (sw == 0) { 
    pushMsec = pushMsec + delayMsec;
    delay(20);
  } 
  if (pushMsec > 1500) {
    pushMsec = 0;
  }

//  Serial.write(map(pushMsec, 0, 5000, 0, 255));
   Serial.write(sw);
   Serial.write(pushMsec & 255);
   Serial.write((pushMsec >> 8) & 255);
  delay(delayMsec);
}

t1614_switch_tk.py

 1
 2
 3
 4
 5
 6
 7
 8
 9
10
11
12
13
14
15
16
17
18
19
20
21
22
23
24
25
26
27
28
29
30
31
32
33
34
35
36
37
38
39
40
41
42
43
44
45
46
47
48
49
50
51
52
53
54
55
56
57
58
59
60
61
62
63
64
65
66
67
68
69
70
71
72
73
74
75
76
77
78
79
80
81
82
83
84
85
86
87
88
89
90
91
92
93
94
95
#
# t1614_switch_tk.py
#
# read signal from switch -  hello-world
#    t1614_switch_tk.py serial_port
#
# Tatsuro Homma 04/10/21
#
# This work may be reproduced, modified, distributed,
# performed, and displayed for any purpose, but must
# acknowledge this project. Copyright is retained and
# must be preserved. The work is provided as is; no
# warranty is provided, and users accept all liability.
#

from tkinter import *
import serial
import sys

WINDOW = 600 # window size

def idle(parent,canvas):
   global filt,eps
   #
   # idle routine
   #
   byte2 = 0
   byte3 = 0
   byte4 = 0
   ser.flush()
   while 1:
      #
      # find framing 
      #
      byte1 = byte2
      byte2 = byte3
      byte3 = byte4
      byte4 = ord(ser.read())
      if ((byte1 == 1) & (byte2 == 2) & (byte3 == 3) & (byte4 == 4)):
         break
   #
   # read data
   #
   status = ord(ser.read())
   low = ord(ser.read())
   high = ord(ser.read())
   value = (256*high+low)
   #
   # update display
   #
   if (status == 0):
      x = int(.3*WINDOW + (.9-.3)*WINDOW*value/1500)
      canvas.itemconfigure("text",text="%d msec"%value)
      canvas.coords('rect1',.3*WINDOW,.05*WINDOW,x,.2*WINDOW)
      canvas.coords('rect2',x,.05*WINDOW,.9*WINDOW,.2*WINDOW)
      canvas.update()
   else:
      x = int(.3*WINDOW)
      canvas.itemconfigure("text",text="?")
      canvas.coords('rect1',.3*WINDOW,.05*WINDOW,x,.2*WINDOW)
      canvas.coords('rect2',x,.05*WINDOW,.9*WINDOW,.2*WINDOW)
      canvas.update()
   #
   # call after idle
   #
   parent.after_idle(idle,parent,canvas)

#
#  check command line arguments
#
if (len(sys.argv) != 2):
   print("command line: t1614_switch_tk.py serial_port")
   sys.exit()
port = sys.argv[1]
#
# open serial port
#
ser = serial.Serial(port,9600)
ser.setDTR()
#
# set up GUI
#
root = Tk()
root.title('t1614_switch_tk.py (q to exit)')
root.bind('q','exit')
canvas = Canvas(root, width=WINDOW, height=.25*WINDOW, background='white')
canvas.create_text(.15*WINDOW,.125*WINDOW,text=".33",font=("Helvetica", 24),tags="text",fill="#0000b0")
canvas.create_rectangle(.2*WINDOW,.05*WINDOW,.3*WINDOW,.2*WINDOW, tags='rect1', fill='#b00000')
canvas.create_rectangle(.3*WINDOW,.05*WINDOW,.9*WINDOW,.2*WINDOW, tags='rect2', fill='#0000b0')
canvas.pack()
#
# start idle loop
#
root.after(100,idle,root,canvas)
root.mainloop()

Outcome (python tkinter)

4. Processing

Processing: t1614_fade_blink02_read.pde

 1
 2
 3
 4
 5
 6
 7
 8
 9
10
11
12
13
14
15
16
17
18
19
20
21
22
23
import processing.serial.*;

Serial port;

int x;
int before_x;
void setup(){
  size(600, 600);
  port = new Serial(this, "/dev/tty.usbserial-D307RG9Y", 9600);
}

void draw(){
  background(255);

  if (port.available() > 0){
    x = port.read();
    if (x > before_x){
      println(x);
      ellipse(300,300,x,x);
    }
    before_x = x;
  }
}

Outcome (Processing)

5. Browser (Web serial API + p5.js)

Arduino: t1614_Web-serial-api_sample.ino
Write and read valude over serial
 1
 2
 3
 4
 5
 6
 7
 8
 9
10
11
12
13
14
15
16
17
18
19
20
21
22
23
24
25
26
27
28
29
30
31
32
33
const int switchPin = 0;
const int ledPin = 3;

void setup() {
// put your setup code here, to run once:
    pinMode(ledPin,OUTPUT);
    Serial.begin(9600);
}

void loop() {
// put your main code here, to run repeatedly:
    while(Serial.available()){
        char data = Serial.read();
        switch(data){
            case 'A':
                digitalWrite(ledPin, HIGH);
                //do this when A is sent from the USB-host/computer
                break;
            case 'B':
                digitalWrite(ledPin, LOW);
                //do this when B is sent from the USB-host/computer
                break;
            case 'Q':
                //Send the current value on analogPin 0 to the USB-host/computer
                Serial.write(map(analogRead(0),0,1023,0,255));
            break;
        }
    }
    Serial.print(digitalRead(0));
    Serial.print(", ");
    Serial.println(digitalRead(0));
    delay(100);
}

Browser configuration: - On Chrome browser, set url as chrome://flags/#enable-experimental-web-platform-features and “Enable” it.

Following index.htm, sketch.js and style.css is on p5.js.

Ref. Let Arduino Control Your Browser

index.html

  1
  2
  3
  4
  5
  6
  7
  8
  9
 10
 11
 12
 13
 14
 15
 16
 17
 18
 19
 20
 21
 22
 23
 24
 25
 26
 27
 28
 29
 30
 31
 32
 33
 34
 35
 36
 37
 38
 39
 40
 41
 42
 43
 44
 45
 46
 47
 48
 49
 50
 51
 52
 53
 54
 55
 56
 57
 58
 59
 60
 61
 62
 63
 64
 65
 66
 67
 68
 69
 70
 71
 72
 73
 74
 75
 76
 77
 78
 79
 80
 81
 82
 83
 84
 85
 86
 87
 88
 89
 90
 91
 92
 93
 94
 95
 96
 97
 98
 99
100
101
102
103
104
105
106
107
108
109
110
111
112
113
114
115
116
117
118
119
120
121
122
123
124
125
126
127
128
129
130
131
132
133
134
135
136
137
138
139
140
141
142
143
144
145
146
147
148
149
150
151
152
153
154
155
156
157
158
159
160
161
162
163
164
165
166
167
168
169
170
171
172
173
174
175
<!DOCTYPE html>
<html lang="en">
  <head>
    <script src="https://cdnjs.cloudflare.com/ajax/libs/p5.js/1.1.9/p5.js"></script>
    <script src="https://cdnjs.cloudflare.com/ajax/libs/p5.js/1.1.9/addons/p5.sound.min.js"></script>
    <link rel="stylesheet" type="text/css" href="style.css">
    <meta charset="utf-8" />

  </head>
  <body>
    <div id="serialControls">
    <button id="connectButton">Connect</button><span id="statusBar">Disconnected</span><br />
    <input id="sendText" type="text" /><input id="sendButton" type="button" value="send" /><br />
    <textarea readonly id="receiveText" ></textarea>
    </div>
<script type="text/javascript">
/*
This code is highly based on the webSerial tutorial by Google:
https://codelabs.developers.google.com/codelabs/web-serial/#0

The intention is to get you started with using webSerial for your Arduino project.


*/

var val1 = 0;
var val2 = 0;
    //Define the elements
let sendText = document.getElementById("sendText");
let sendButton = document.getElementById("sendButton");
let receiveText = document.getElementById("receiveText");
let connectButton = document.getElementById("connectButton");
let statusBar = document.getElementById("statusBar");

//Couple the elements to the Events
connectButton.addEventListener("click", clickConnect)
sendButton.addEventListener("click", clickSend)

//When the connectButton is pressed
async function clickConnect() {
    if (port) {
        //if already connected, disconnect
        disconnect();

    } else {
        //otherwise connect
        await connect();
    }
}

//Define outputstream, inputstream and port so they can be used throughout the sketch
var outputStream, inputStream, port, serialReader;
navigator.serial.addEventListener('connect', e => {
    statusBar.innerText = `Connected to ${e.port}`;
    connectButton.innerText = "Disconnect"
  });

  navigator.serial.addEventListener('disconnect', e => {
    statusBar.innerText = `Disconnected`;
    connectButton.innerText = "Connect"
  });
//Connect to the Arduino
async function connect() {
    disconnect()
    //Optional filter to only see relevant boards
    const filter = {
        usbVendorId: 0x2341 // Arduino SA
    };

    //Try to connect to the Serial port
    try {
        port = await navigator.serial.requestPort(/*{ filters: [filter] }*/);
        // Continue connecting to |port|.

        // - Wait for the port to open.
        await port.open({ baudRate: 9600 });

        statusBar.innerText = "Connected";
        connectButton.innerText = "Disconnect"
        let decoder = new TextDecoderStream();
        inputDone = port.readable.pipeTo(decoder.writable);
        inputStream = decoder.readable;

        const encoder = new TextEncoderStream();
        outputDone = encoder.readable.pipeTo(port.writable);
        outputStream = encoder.writable;

        serialReader = inputStream.getReader();
        readLoop();
    } catch (e) {

        //If the pipeTo error appears; clarify the problem by giving suggestions.
        if (e == "TypeError: Cannot read property 'pipeTo' of undefined") {
            e += "\n Use Google Chrome and enable-experimental-web-platform-features"
        }
        if (e == "TypeError: Failed to execute 'requestPort' on 'Serial': 1 argument required, but only 0 present."){
        e += "\n Use Google Chrome and enable-experimental-web-platform-features"
        }
      if (e == "NetworkError: Failed to open serial port."){
      e +="Try unplugging the Arduino and connect again"
      }
        disconnect()
        connectButton.innerText = "Connect"
        statusBar.innerText = e;
    }
}
//Write to the Serial port
async function writeToStream(line) {
    const writer = outputStream.getWriter();
    writer.write(line);
    writer.releaseLock();
}

//Disconnect from the Serial port
async function disconnect() {

    if (serialReader) {
        await serialReader.cancel();
        await inputDone.catch(() => { });
        serialReader = null;
        inputDone = null;
    }
    if (outputStream) {
        await outputStream.getWriter().close();
        await outputDone;
        outputStream = null;
        outputDone = null;
    }
    statusBar.innerText = "Disconnected";
    connectButton.innerText = "Connect"
    //Close the port.
    await port.close();
    port = null;
}

//When the send button is pressed
function clickSend() {
    //send the message
    writeToStream(sendText.value)
    //and clear the input field, so it's clear it has been sent
    sendText.value = "";

}

//Read the incoming data
async function readLoop() {
    while (true) {
        const { value, done } = await serialReader.read();
        if (done === true){
            break;
        }
        //When recieved something add it to the big textarea
        receiveText.value += value;

        serialString = receiveText.value;
        //Scroll to the bottom of the text field
        var patt = new RegExp(/([0-9]{1,6}), ([0-9]{1,6})\n/m);
  var res = patt.exec(serialString);
  if(res != null){
      serialString = serialString.replace(patt,"");//"["+res[1]+", "+res[2]+"]");
  val1 = res[1]
  val2 = res[2]
  }
   receiveText.value = serialString
        receiveText.scrollTop = receiveText.scrollHeight;

}
}
    </script>

    <script src="sketch.js"></script>
  </body>
</html>

I needed to change “baudrate” on sample to “baudRate”.

sketch.js

 1
 2
 3
 4
 5
 6
 7
 8
 9
10
11
12
13
14
15
16
17
18
19
20
21
22
23
24
25
26
27
28
29
30
31
/*
This is simple code to control and read from the Arduino in P5
*/

function setup() {
  createCanvas(400, 400);
}
var i = 0;
function draw() {
  i++;
  background(100*ledStatus);
  rect(val1 / 2, val2/2, 10, 10);
  fill(255, 255, 255);
  textSize(30);
  text(val1, 60, 60)
}
var ledStatus = false;

function mouseClicked() {
  if (ledStatus === true) {
    writeToStream('B.')
    ledStatus = false;
  } else {
    writeToStream('A.')
    ledStatus = true;
  }
}

function keyPressed() {
  select('#serialControls').hide();
}

style.css

1
2
3
4
5
6
7
html, body {
  margin: 0;
  padding: 0;
}
canvas {
  display: block;
}

Outcome (Web Serial APi)

References


Last update: April 12, 2021